The Rules of
Kabetopo
Version: 4.0
Last revised: 7/30/24
First publication: 5/29/23
Legalese: This is an original work. This document and ruleset are protected by pertinent copyright laws. All rights reserved.
Visual Guide: A video guide to this official rulebook can be found here.
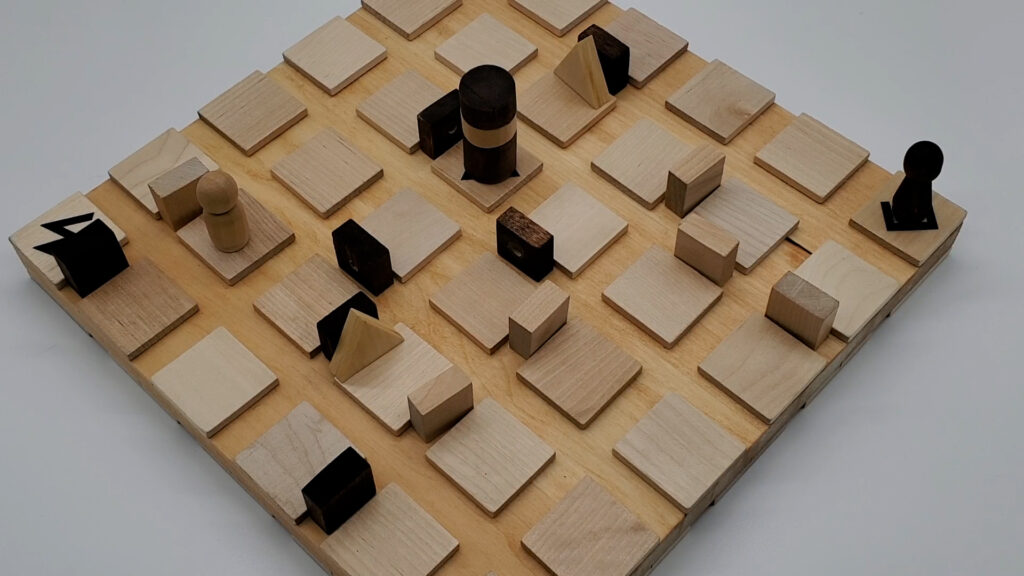
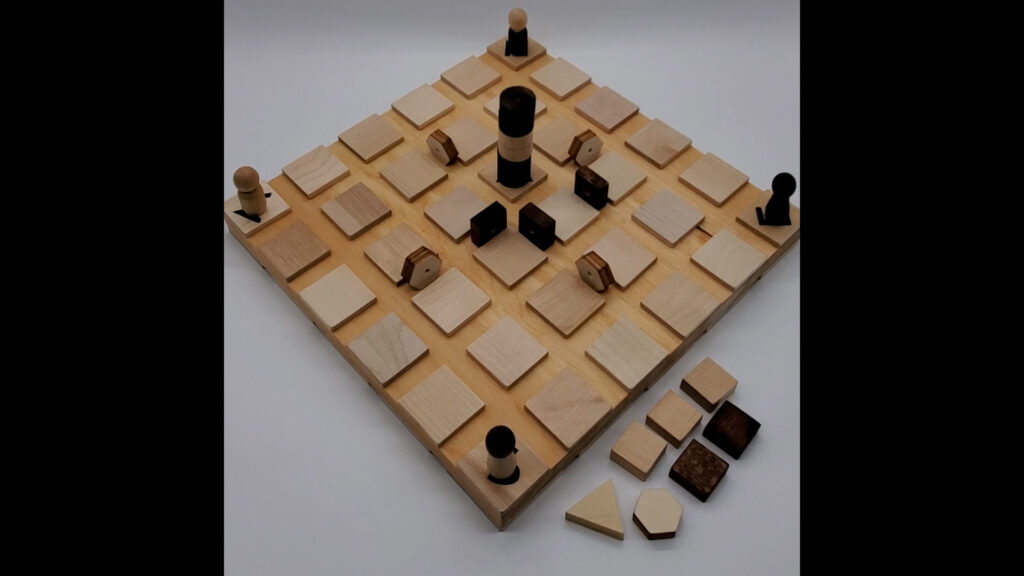
TABLE OF CONTENTS
- Overview
- Game Play
- Resources
- Special Moving Rules
- Expansion Rules
- The 3- And 2-Player Games
- Appendix
OVERVIEW
KABETOPO is an abstract strategy game for 2 to 4 players. It takes about 30 minutes of gameplay. The deceptively simple objective is twofold: On a 6 by 6 board, 1) starting from your corner, maneuver your runner to the center mountain to obtain a stone, then, 2) make a mad dash towards any corner other than your starting square. Simple. Here’s the catch: you’re racing against other opponents; There are walls in your way; Your opponents can drop even more walls in your way, but not to worry, you can return the favor; And in the middle of all this madness…portals! Whoosh!
TL;DR – It’s a race. Score points by completing tasks during the race. Most points wins.
ABOUT THIS RULEBOOK – This rulebook will assume 4 players. The 3-player and 2-player rulesets are slightly different. The differences will be pointed out in later sections. This document contains the most up-to-date rules as of the “last revised” date in the meta-data above.
CONTENTS
- 1 6×6 Board
- 4 Runners
- 12 Walls
- 11 Monoliths (3 with holes)
- 8 Portals (4 with holes)
- 4 Locks
- 4 Stones
- 4 Speed Tokens (Note: Your set may have come with only 2 speed tokens. Substitute 2 coins for the other two tokens.)
- You provide: 1 twelve-sided die, OR use Google’s Roll Dice online app (much better option).
Game Play
OBJECTIVE
- Obtain a stone from the mountain.
- Dash to a corner square other than you own starting square.
—
- Score points by:
- Acquiring a stone the fastest.
- Advancing your runner to a corner square the fastest.
- Getting bonus points for other achievements.
SETUP
- Place the dark runner on the East square, the light runner on the West square, another on North, and the final on South.
- Place the 4 stones on the mountain icon in the center of the board. Order from top-down is both dark stones, then both light stones. The board should look like Diagram 1 below.
- Set up 3 monoliths (with the holes) randomly inside the center four squares by performing the 2×2 Field Setup (Appendix).
- Set up 1 portal (with a hole) randomly in each of the 2×2 fields shown in Diagram 2 using the 2×2 Field Setup (Appendix). By the end of the process, there should be a total of 4 portals on the board placed randomly.
- Each player starts with:
- 3 walls
- 1 monolith
- 1 portal
- 1 lock
- 1 speed token with the “+1” side up.
—
These collectively are called a player’s resource pool.

Diagram 1 – The board setup after Step 2.
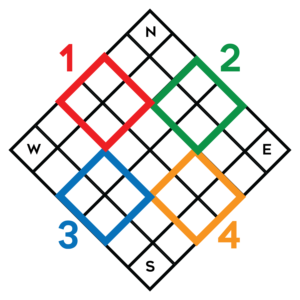
Diagram 2 – Set up one portal in each of the colored regions.
PLAYING THE GAME
- The player controlling the dark runner goes first. Play goes clockwise.
On a player’s turn, they perform one of two actions:
Move, or,
Use a resource from their resource pool.
—
- Moving
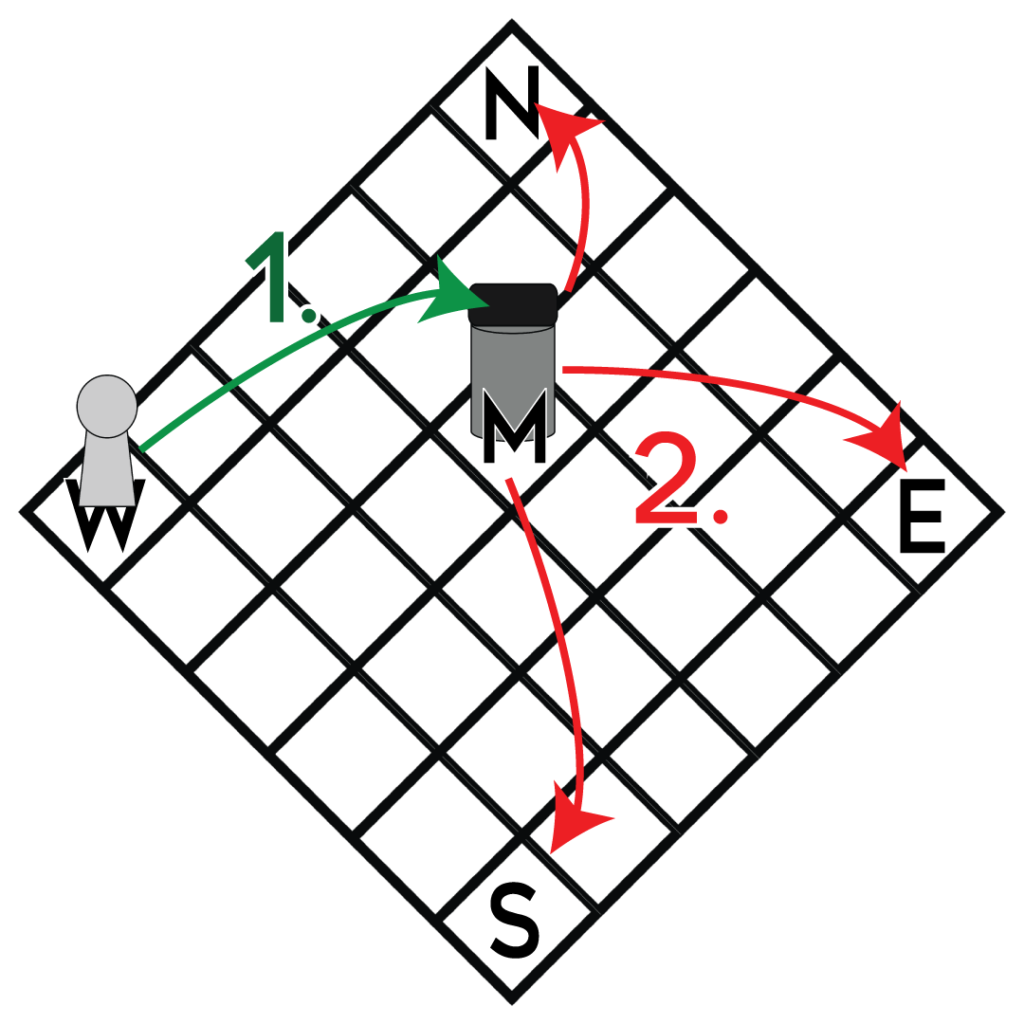
- Runners can move one square orthogonally. No diagonal movement is allowed, nor is moving off the edge of the board. [EXAMPLE]
- Runners cannot move onto a square that is already occupied by another runner. The exceptions are the E, W, N, and S corner squares. Multiple runners may occupy these 4 squares only.
- Other ways of moving are described in the Special Moving Rules section below.
- Runners can move one square orthogonally. No diagonal movement is allowed, nor is moving off the edge of the board. [EXAMPLE]
—
Using Resources
From their resource pool, a player may:
Drop 1 wall onto the board
Drop 1 monolith onto on the board
Drop 1 portal onto the board
Drop 1 lock onto the board
- All these resources are explained in the Resources section below.
—
- If you have no legal move, i.e. you cannot move your runner to a legal square and you have no more resources to drop, you must pass your turn. Conversely, you cannot voluntarily pass up your turn if you have a legal move.
ENDING THE ROUND
When a runner obtains a stone then reaches a corner square other than their starting square, that player can declare “Tadaima,” which in Japanese means, “I’m home.” Play continues until a second, then a third player declares Tadaima. In other words, there is a 1st, 2nd, and 3rd place. Note that multiple runners may declare Tadaima on the same corner square.
Once the third Tadaima is declared, the round ends, and the scores are tallied. (Scoring explained next section.)
SCORING
There are 5 ways to score points: First Stone, Second Stone, Tadaima, Natural Tadaima, and Preservation.
- First Stone: The first player to obtain a stone receives 2 points.
- Second Stone: The second player to obtain a stone receives 1 point.
- Tadaima (“I’m Home”): The first player to declare Tadaima, receives 3 points. The second, 2 points. The third, 1 point.
- Natural Tadaima: If a player declares Tadaima on the square opposite their starting square, they receive 1 bonus point.
- Preservation: The player that has the most resources remaining at the end of the current game (i.e. has the most total walls, monoliths, portals, locks, and stones receives 1 bonus point. If two or more players are tied in highest total resources (even if total resources equal zero), they all receive the 1 bonus point.
—
How to write down the score is explained below in the Appendix.
COMPLETING THE MATCH
Because of the imbalances caused by randomizing some monoliths and portals at the start, to keep things fair, a second, third, then fourth rounds are played, turning the board 90 degrees clockwise before each round so that by the end, each player will have played with all 4 runners.
To setup for subsequent rounds:
Remove from the board only the walls, monoliths, portals, and locks dropped by any of the players. Do not remove monoliths and portals that were set up during Setup steps 3 and 4 at the beginning of game 1 (i.e. the ones with the identifying holes).
Place the each runner back on their starting squares.
- Place the stones back on top of the mountain.
Reallocate 3 walls, 1 monolith, 1 portal, and 1 lock to each player’s resource pool.
- Turn the board 90 degrees clockwise so that the players rotate runners.
WINNING THE MATCH
- All points earned in each round are added together for a grand total. Whoever has the highest grand total at the end of 4 rounds wins the match.
—
Tiebreakers: Ties are broken in the following order:
- Single round scores. (Compare highest single round scores. If tied, compare 2nd highest scores. If necessary, compare 3rd, then 4th highest scores.)
- Highest total Tadaima points.
- Most 1st place Tadaimas declared.
- Most Natural Tadaimas declared.
- Highest total Stone points.
- Most First Stones.
- Highest total Preservation points.
- Resource count after the final round.
- If still tied, match is drawn.
Resources
WALLS
- Walls can be dropped anywhere on the board subject to the following restrictions:
- A wall cannot be placed if it ends up blocking off access to a corner square.
- A wall cannot be placed if it ends up enclosing a runner.
MONOLITHS
- Monoliths act exactly like walls, except that when you drop them, you get an extra move.
PORTALS
- Teleporting
- If a runner reaches the entrance to a portal, it may teleport to any other portal and exit from any side as both portal ends are considered and entrance and an exit. [EXAMPLES]
- Teleporting is considered one move, i.e. you cannot reach a portal entrance and teleport in the same turn.
- Portals can be used by any runner. No runner “owns” a portal.
- Dropping
- Portals may be dropped anywhere, with the exception of the board’s edge, nor the lines that make up any corner square. [EXAMPLES]
- If you drop a portal on any edge of your current square, you may also teleport in the same turn.
LOCKS
- Locking portals:
- On your turn, you may drop a lock in front of any portal entrance (like this). For the rest of the game, that side of the portal is blocked and cannot be used. The other side may still be used as normal.
- A portal can be double-locked, i.e. locks can be placed on both sides of a portal, effectively rendering the portal useless.
- A lock cannot be dropped in front of a portal entrance if it results in a home square being cut off.
- If a runner is surrounded on three sides by a combination of walls, monoliths, the board’s edge, and 1 portal, a lock cannot be placed in front the portal’s entrance facing the runner which would entomb the runner .
- A lock in front of a portal entrance essentially acts like a wall – you cannot go through it. However, unlike a wall, it can never be used as a door (see Doors section below).
- Locking doors:
- In addition to using locks to block portal entrances, you may use a lock to prevent a door from opening, i.e. if you drop a lock on any side of a door, that door may never be opened for the rest of the game.
- Lock It Behind You
- After you teleport, you may drop a lock on either the side of the portal that you just exited, or the side of the portal you entered.
- Lock Bonus Move
- After you drop a lock, you may make an extra move. (Note: this lock bonus move cannot be stacked with the Lock It Behind You rule above.)
- Unlocking
- If you have a lock in your resource pool, you may use it to remove any active lock on the board. The two locks are then removed from play. They will not count towards any player’s preservation count.
- Unlocking counts as one turn, i.e. you do not receive the Lock Bonus Move (above) and gain an extra move.
SPEED TOKENS
Note: Your set may have come with only 2 speed tokens. Substitute 2 coins for the other two tokens, making a total of 4. The head side is the “+1” side.
- A speed token allows a runner to make an extra move within the same turn in any orthogonal direction, even in a different direction than the original move. [EXAMPLE]
- Speed tokens provide an extra move only, not an extra drop.
- They can be “cashed in” any time during your turn only.
- Immediately upon cash-in, flip the speed token “+1” side down to indicate that it’s now out of play. Only in-play speed tokens (i.e. ones with the “+1” side up) count towards the Preservation resource count at the end of the round.
—
Speed tokens may be used in conjunction with leapfrogging, i.e. make an initial move, cash in, then leap frog, OR, leap frog, cash in, then move one more space in any direction. [EXAMPLES]
Speed tokens may be used in conjunction with portals, i.e. teleport, then move one more space in any direction, OR, move onto a portal entrance with your initial move, cash in, then teleport. [EXAMPLES]
Speed tokens may be used in conjunction with doors, i.e. move to the entrance of a door, cash in, then open the door and move though it. OR, you may open and move through a door first then cash in and move one more space.
Speed tokens may be used after dropping a monolith, since the action of dropping a monolith also allows a player to move 1 space afterwards, i.e. drop a monolith, make bonus move, cash in, then make another move.
Special Moving Rules
TELEPORTING
- If a runner reaches the entrance to a portal, it may teleport to any other portal and exit from any side as both ends are considered an entrance and an exit. [EXAMPLES]
- Teleporting is considered one move, i.e. you cannot reach a portal entrance and teleport in the same turn.
LEAPFROGGING
- If runners are on facing squares with no wall or monolith between them, they may jump over the other runner .
- The jump is made in a straight direction only. Angled jumps are not allowed.
- There must not be a wall, monolith, or the board’s edge directly behind the runner being jumped over. [EXAMPLES]
- It’s possible to leapfrog over multiple runners.
- Leapfrogging and portals: A runner may leapfrog another runner through a portal, but must land in the square directly behind the leapt-over runner in line with the portal exit and there must not be a wall or monolith directly behind the to-be-leapt-over runner in line with the portal exit. [EXAMPLES]
- A runner may never leapfrog onto a home square, even through a portal.
THE MOUNTAIN
The Mountain is a special square in the middle of the board marked by the mountain icon.
- The mountain may never be enclosed with walls, monoliths, or locked portals on more than 2 sides, nor enclosed by an extended enclosure. [EXAMPLES]
- Going up The Mountain: The mountain can only be entered through an unobstructed path, i.e. there are no obstacles (walls, monoliths, or locked portals) in between a runner and the mountain.
- Going down The Mountain: A runner can exit the mountain to any immediate orthogonal square even if it’s obstructed by a wall, monolith, or locked portal.
- Bumping/King Of The Mountain: If one runner is already on the mountain, and another player decides to move onto the mountain on their current turn, the runner on the mountain gets “bumped off” the mountain onto any immediate orthogonal square of the knocking player’s choosing, regardless of whether there is a wall, monolith, or locked portal between the mountain and the orthogonal square. [EXAMPLE]
- Teleporting and The Mountain:
- If there’s a portal touching The Mountain, runner may teleport onto and off of The Mountain.
- If a runner gets bumped off The Mountain, and the bumping player decides to push the opposing runner through a portal, the bumper gets to decide which portal the bumped runner will end up exiting.
- Leapfrogging and The Mountain:
- A runner may leapfrog another runner onto The Mountain.
- A runner already on top of The Mountain may leapfrog another runner onto the square directly behind the leapt-over runner.
- A runner may leapfrog over another runner that’s on top of The Mountain.
DOORS
- If there are three consecutive walls or monoliths in a straight line, the middle wall can become a door which may be “swung open.” [EXAMPLES]
- Monoliths cannot be doors. Only walls may potentially be doors.
- Doors may be swung open only onto open connecting 90-degree lines. If there exists a wall, monolith or portal on a connecting 90-degree line, the door may not be swung open on that line. [EXAMPLES] Keep in mind that when a door is swung open, it may no longer be a door after being opened, e.g. when on its new 90-degree edge, it ends up being in line with only one other wall. This no longer makes it a door by definition and turns it back into a wall.
- When you are at the entrance of a door, you open a door and move through it 1 space on the same turn, i.e. opening a door and stepping through is considered 1 move. However, you may not do the opposite, i.e. first move onto a door entrance, then open on the same turn.
- If you drop a monolith, you may open and walk through a door on your afforded extra move.
- A door may not be swung open in such a direction that its new position results in a corner square being completely blocked off.
THE CORNERS (a reminder)…
- Cannot be walled off.
- Portals cannot be placed on them.
- Cannot be leapfrogged onto.
- May be occupied by multiple runners.
Expansion Rules
The following rules aren’t part of the main ruleset. They’re optional and are experimental for the time being. You might want to add them to your game to spice things up.
—
No expansion rules exist at the moment…
The 3- And 2-Player Games
THE 3-PLAYER GAME
The 3-player game is similar to the 4-player game. Same rules as the 4-player game, just use 3 runners – East, South, and West. No North. East gets the first turn.
- There are 3 rounds in the match. Highest point total wins.
- There are no points awarded for 3rd place Tadaima.
THE 2-PLAYER GAME
The two-player is slightly different from the 4- and 3-player games, but enough so that it warrants its own page. So learn about the 2-player game HERE.
THE 2-PLAYER GAME
The two-player is slightly different from the 4- and 3-player games. A revised ruleset for 2-players is in progress. For now, treat the 2-player game like the 4-player game, with the following exceptions:
- Use only 2 runners on East and West.
- To make a 2-player match longer than 2 rounds, play 4 or 6 rounds, turning the board 180 degrees after each round, and re-randomizing the monoliths and portals every 2 rounds.
- Scoring:
- First Stone receives 2 points. No Second Stone.
- Declaring Tadaima receives 3 points, but if opposite-squared Tadaima, then 4 points. Round ends after only 1 Tadaima.
- Preservation bonus point is given to player with more remaining resources at the end of the round. If both players are tied in resource count, no player gets the bonus point.
- Unseen Path Bonus – After declaring Tadaima, if the opposing runner has 2 or 3 squares left to travel before it reaches a corner, the Tadaima-declaring player receives 1 bonus point. 4 or 5 squares remaining, 2 bonus points. 6 or more, 3 bounus points. Use the most efficient path possible to determine the number of squares remaining.
Appendix
The 2×2 Field Setup
Take any 2×2 region and label its edges as shown below in Diagram 1. Roll a 12-sided die. Whatever number comes up, place a monolith or portal on that edge. If there’s a monolith or portal already occupying that edge, or the roll points you to the board’s edge, simply re-roll. Also, if the 3rd monolith ends up enclosing The Mountain on a third side, simply re-roll.
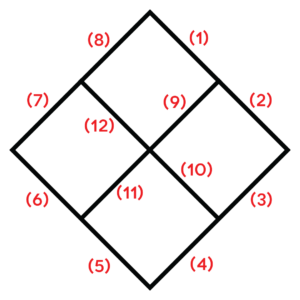
Diagram 1: Labeling the 2×2 region’s edges.
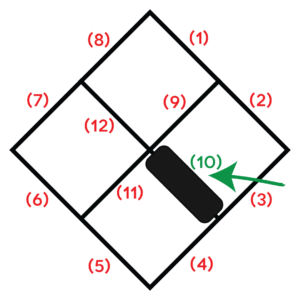
Example: A 10 is rolled, so a monolith is placed on the edge labelled (10).
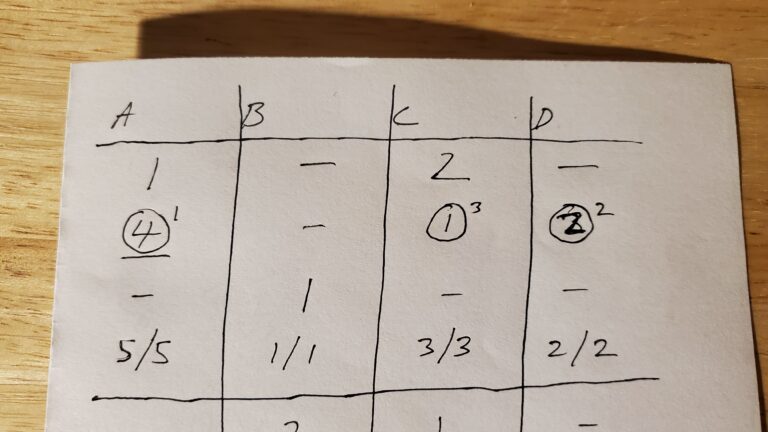
How To Keep Score
Use one column for each player. Each row represents a scoring event:
- Row 1 – First and Second Stone:
- Write a “2” under the player who gets First Stone.
- Write a “1” under the player who gets Second Stone.
- Write a dash under the other two players.
- Row 2 – Tadaima:
- Write a “3” under the player who declares Tadaima first, or “4” if natural Tadaima. Circle this number, and write a “1” superscript to indicate they came in first. Also, if natural Tadaima, underline the score.
- For second and third place Tadaima, do the same, but use “2” and “3” superscripts.
- Row 3 – Preservation:
- Write a “1” under the player(s) who receive the Preservation bonus point.
- Write a dash under the other players.
- Row 4 – Write the round score, slash, grand total for each player.
- Draw a line to separate rounds.
How To Teach The Game To Newbies
These are step-by-step guides on how to introduce the game to new players.
Copyright 2023-2024